

Apache Axis2 Advanced User's Guide
This guide will help you get started with Axis2, the next generation of Apache Axis! It gives a detailed description on how to write Web services and Web service clients using Axis2, how to write custom modules, and how to use them with a Web service. Advanced topics and samples that are shipped with the binary distribution of Axis2 are also discussed.
Introduction
This user guide is written based on the Axis2 Standard Binary Distribution. The Standard Binary Distribution can be directly downloaded or built using the Source Distribution. If you choose the latter, then the Installation Guide will instruct you on how to build Axis2 Standard Binary Distribution using the source.
Please note that Axis2 is an open-source effort. If you feel the code could use some new features or fixes, please get involved and lend us a hand! The Axis developer community welcomes your participation.
Let us know what you think! Send your feedback to "java-user@axis.apache.org". (Subscription details are available on the Axis2 site.) Kindly prefix the subject of the mail with [Axis2].
Getting Started
The first two sections of the user guide explain how to write and deploy a new Web Service using Axis2, and how to write a Web Service client using Axis2. The next section - Configuring Axis2 - provides an introduction to important configuration options in Axis2. The final section - Advanced Topics - provides references to other features.
In this (first) section, we will learn how to write and deploy Web services using Axis2. All the samples mentioned in this guide are located in the "modules/samples/userguide/src" directory of Axis2 standard binary distribution.
Please deploy axis2.war in your servlet container and ensure that it works fine. The Installation Guide gives you step-by-step instructions on just how to build axis2.war and deploy it in your servlet container.
Creating a New Web Service
If you are interested in how to write a Web Service client using Axis2, it is described under Writing a Web Service Client. Axis2 provides two ways to create new Web Services, using code generation and using XML based primary APIs. The following section explains how to start from a WSDL, and create a new service with code generation. For the XML based primary API, please refer to the section Writing Web Services Using Axis2's Primary APIs for more information. However, if you are a new user, it is better to follow the code generation approach first (given below)
Starting with WSDL, Creating and Deploying a Service
We start with a WSDL, however if you do not have a WSDL and need to create a WSDL from a java class, please use the Java2WSDL tool to create the WSDL. As you might already know, a WSDL description of a service provides a precise definition of that web service. Axis2 can process the WSDL and generate java code that does most of the work for you. At the server side, we call them Skeletons, and at the client side, Stubs.
This method of writing a Web service with Axis2 involves four steps:- Generate the skeleton code.
- Add business logic.
- Create a *.aar archive (Axis Archive) for the Web service.
- Deploy the Web service.
Step1: Generate Skeleton Code
To generate the skeleton and required classes, you can use the WSDL2Java tool provided in Axis2. This tool is located in the bin directory of the distribution and can be executed using the provided scripts (.bat or .sh). The tool's parameter list can be found in the Axis2 Reference Document.
The parameters for the wsdl2java tool in our example are as follows. Please note that, for this example, we are using xmlbeans as the data binding framework, and the generated code will be placed in a "samples" directory.
wsdl2java.sh -uri ../samples/wsdl/Axis2SampleDocLit.wsdl -ss -sd -d xmlbeans
-o ../samples -p org.apache.axis2.userguide
This will generate the required classes in the "sample/src" directory, and the schema classes in the "modules/samples/resources/schemaorg_apache_xmlbeans" directory. Note that these are not source files and should be available in the class path in order to compile the generated classes.
Step 2: Implement Business Logic
Now you should fill the business logic in the skeleton class. You can find
the skeleton class -Axis2SampleDocLitServiceSkeleton.java- among the
generated classes in the
"modules/samples/src/org/apache/axis2/userguide directory. Let's
fill the echoString(..) method in the skeleton as shown below.
Our sample WSDL-Axis2SampleDocLit.wsdl in "modules/samples/wsdl"
directory has three operations: echoString, echoStringArray, echoStruct. To
see how the others will look when they are filled up, see Code Listing For
Axis2SampleDocLitService Service
public org.apache.axis2.userguide.xsd.EchoStringReturnDocument
    echoString(org.apache.axis2.userguide.xsd.EchoStringParamDocument param4) throws Exception {
    //Use the factory to create the output document.
    org.apache.axis2.userguide.xsd.EchoStringReturnDocument retDoc =
           org.apache.axis2.userguide.xsd.EchoStringReturnDocument.Factory.newInstance();
    //send the string back.
    retDoc.setEchoStringReturn(param4.getEchoStringParam());
   return retDoc;
Step 3: Create Archive File
An Axis2 service must be bundled as a service archive. The next step is to package the classes in an .aar (axis2 archive) and deploy it in Axis2. There is an ant file generated with the code; it will generate the Axis2 service archive for you. However, if you do not want to use ant, you can create an archive with the following steps :
- Compile the generated code.
- Copy "resources/schemaorg_apache_xmlbeans" xmlbeans classes to your class folder.
- Among the generated files, there will be a services.xml file, which is the deployment descriptor for Axis2 service.[learn more about it]. Copy the resources/service.xml to META-INF/services.xml
- Create the archive using content of the class folder. Change the
directory to the class folder and run
jar -cf
    <service-name>.aar
to create the archive.
(To write your own service.xml file, see the sub section in Writing Web Services Using Axis2's Primary APIs )
Once the archive is created, the content of the JAR should look like this:
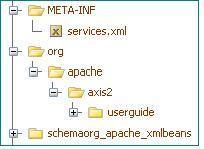
Step 4: Deploy Web Service
The service can be deployed by simply dropping the ".aar" file into the "services" directory in "/webapps/axis2/WEB-INF" of your servlet container. We recommend using Apache Tomcat as the servlet container. Please Note that the services directory is available only after axis2.war has been exploded by Tomcat. However, the easiest way to do it is to start Tomcat after axis2.war is copied to the webapps directory (if you have not already started it). Check the "Services" link on the Home page of Axis2 Web Application (http://localhost:8080/axis2) and see whether the Axis2SampleDocLitService is displayed under the deployed services.
We recommend using the exploded configuration to deploy Axis2 WAR in WebLogic and WebSphere application servers to support the hotupdate/hotdeployment features of Axis2. See Application Server Specific Configuration Guide for details.
Note: Axis2 provides an easy way to deploy Web Services using the "Upload Service" tool in the Axis2 Web Application's Administration module. (See the Web Administration Guide for more information)
Writing a Web Service Client
Axis2 also provides a more complex, yet powerful XML based client API which is intended for advanced users. Read Writing Web Service Clients Using Axis2's Primary APIs to learn more about it. However, if you are a new user, we recommend using the code generation approach presented below.
Generate Stubs
Let's see how we could generate java code (Stub) to handle the client side Web Service invocation for you. This can be done by running the WSDL2Java tool using the following arguments
wsdl2java.sh -uri ../samples/wsdl/Axis2SampleDocLit.wsdl -d xmlbeans
     -o ../samples/src -p org.apache.axis2.userguide
This will generate client side stubs and xmlbeans types for your types. The Stub class that you need to use will be of the form <service-name>Stub. In our example, it will be called "Axis2SampleDocLitServiceStub.java"
Axis2 clients can invoke Web Services both in a blocking and non-blocking manner. In a blocking invocation, the client waits till the service performs its task without proceeding to the next step. Normally, the client waits till the response to its particular request arrives. In a non-blocking invocation, the client proceeds to the next step immediately, and the responses (if any) are handled using a Callback mechanism. Please note that some explanations use the terms Synchronous and Asynchronous to describe the similar invocation strategies.
Do a Blocking Invocation
The following code fragment shows the necessary code calling
echoString operation of the
Axis2SampleDocLitService that we have already deployed. The code
is extremely simple to understand and the explanations are in the form of
comments.
     try {
               org.apache.axis2.userguide.Axis2SampleDocLitServiceStub stub
                  = new org.apache.axis2.userguide.Axis2SampleDocLitServiceStub(null,
                    "http://localhost:8080/axis2/services/Axis2SampleDocLitService");
                //Create the request document to be sent.
                org.apache.axis2.userguide.xsd.EchoStringParamDocument reqDoc =
                org.apache.axis2.userguide.xsd.EchoStringParamDocument.Factory.newInstance();
                reqDoc.setEchoStringParam("Axis2 Echo");
                //invokes the Web service.
                org.apache.axis2.userguide.xsd.EchoStringReturnDocument resDoc =
                stub.echoString(reqDoc);
                System.out.println(resDoc.getEchoStringReturn());
               } catch (java.rmi.RemoteException e) {
                  e.printStackTrace();
              }
First argument of Axis2SampleDocLitPortTypeStub should be the
Axis2 repository for the client. Here we use null to make the stub use
default configurations. However, you can make Axis2 use your own repository
by providing it here. You can find more information about this from the Axis2 Configuration section. You can find code to invoke
other operations from Code
Listing For Axis2SampleDocLitService Service
Do a Non-Blocking Invocation
The stubs also include a method that allows you to do a non-blocking innovation. For each method in the Service, there will be a method start<method-name>. These methods accept a callback object, which would be called when the response is received. Sample code that does an asynchronous interaction is given below.
try {
         org.apache.axis2.userguide.Axis2SampleDocLitServiceStub stub
           = new org.apache.axis2.userguide.Axis2SampleDocLitServiceStub(null,
             "http://localhost:8080/axis2/services/Axis2SampleDocLitService");
             //implementing the callback online
            org.apache.axis2.userguide.Axis2SampleDocLitServiceCallbackHandler callback =
            new org.apache.axis2.userguide.Axis2SampleDocLitServiceCallbackHandler() {
                    public void receiveResultechoString(
                      org.apache.axis2.userguide.xsd.EchoStringReturnDocument resDoc) {
                       System.out.println(resDoc.getEchoStringReturn());
                       }
            };
        org.apache.axis2.userguide.xsd.EchoStringParamDocument reqDoc =
          org.apache.axis2.userguide.xsd.EchoStringParamDocument.Factory.newInstance();
           reqDoc.setEchoStringParam("Axis2 Echo");
           stub.startechoString(reqDoc, callback);
        } catch (java.rmi.RemoteException e) {
          e.printStackTrace();
       }
Even though the above code does a non-blocking invocation at the client API, the transport connection may still operate in a blocking fashion. For example, a single HTTP connection can be used to create a Web Service request and to get the response when a blocking invocation happens at the transport level. To perform a "true" non-blocking invocation in which two separate transport connections are used for the request and the response, please add the following code segment after creating the stub. It will force Axis2 to use two transport connections for the request and the response while the client uses a Callback to process the response.
stub._getServiceClient().engageModule(new QName("addressing"));
stub._getServiceClient().getOptions().setUseSeparateListener(true);
Once those options are set, Axis2 client does the following:
- Starts a new Transport Listener(Server) at the client side.
- Sets the address of the Transport Listener, as the ReplyTo WS-Addressing Header of the request message
- According to the WS-Addressing rules, the Server will process the request message and send the response back to the ReplyTo address.
- Client accepts the response, processes it and invokes the callback with the response parameters.
Using Your Own Repository
You can also use your own repository with an Axis2 Client. The code below shows how to do this.
String axis2Repo = ...
String axis2xml = ...
ConfigurationContext configContext =
ConfigurationContextFactory.createConfigurationContextFromFileSystem(axis2Repo, axis2xml);
Service1Stub stub1 = new Service1Stub(configContext,...);
//invoke Service1
Service2Stub stub2 = new Service2Stub(configContext,...);
//invoke Service2
Note by creating the ConfigurationContext outside and passing
it to the stubs, you could make number of stubs to use same repository, thus
saving the configuration loading overhead from each request.
Configuring Axis2
Axis2 Repository
Axis2 configuration is based on a repository and standard archive format. A repository is a directory in the file system, and it should have the following:
- axis2.xml, the Axis2 global deployment descriptor in conf/axis2.xml file
- services directory, which will have the service archives
- modules directory (optional), which will have the module archives
Both services and modules will be identified and deployed once their
archives are copied to the corresponding directories. At the server side,
users should specify the repository folder at the time of starting the Axis2
Server (e.g. HTTP or TCP). In Tomcat, webapps/axis2/WEB-INF
folder acts as the repository. At the client side, binary distribution can
itself be a repository. You can copy the conf directory which includes the
axis2.xml file from the exploded axis2.war and edit it to change the global
configurations repository.
Global Configurations
The Global configuration can be changed by editing the axis2.xml file, refer to the Axis2 Configuration Guide for more information.
Add New Services
New services can be written either using WSDL based code generation as we did, or from scratch as explained in Writing Web Services Using Axis2's Primary APIs. Read Creating a Service from Scratch for more information. Also refer to Axis2 Configuration Guide for a reference on services.xml file.
Engaging Modules
Each module(.mar file) provides extensions to Axis2. A module can be deployed by copying it to the modules directory in the repository. Then it becomes available and can be engaged at a global, service or operation scope. Once engaged, it becomes active (adds handlers to the execution flow) at the respective scope. Please refer to Axis2 architecture guide for detailed explanation. The following table explains the semantics of scope, and how to engage modules in those scopes.
| Scope | Semantics | How to Engage |
|---|---|---|
| Global | Add handlers in the module to all the services. Addressing Handler can be only engaged as global | By adding a <module ref="addressing"/> to the Axis2 xml file
or calling
stub._getServiceClient().engageModule(moduleName)
at client side |
| Service | Add handlers in the module to a specific service | By adding a <module ref="addressing"/> to a service.xml file in a service archive |
| Operation | Add handlers in the module to a specific operation | By adding a <module ref="addressing"/> inside an operation tag of a service.xml file in a service archive |
* If a handler is added to a service or an operation, it will be invoked for every request received by that service or operation
Axis2 provides a number of built in Modules (such as addressing and Security (Rampart)), and they can be engaged as shown above. Please refer to each module on how to use and configure them. You can also create your own modules with Axis2. Also refer to Axis2 Configuration Guide for a reference on the module.xml file.
WS-Addressing Support
WS-Addressing support for Axis2 is implemented by the addressing module. To enable addressing, you need to engage the addressing module in both server and client sides.
- To enable addressing at the server side, you need to copy the addressing.mar file to the modules directory of the server's axis2 repository. To engage the module, add a <module ref="addressing"/> to axis2.xml. The Addressing module can be engaged only at global level.
- To enable addressing at the client side, you should add it to the repository and provide the repository as an argument to the ServiceClient or generated stub or have it in your classpath.
- To engage the addressing module, you should either add
<module ref="addressing"/> to the axis2.xml file at the client side
or call
stub._getServiceClient().engageModule(moduleName)
Advanced Topics
Transports
By default, Axis2 is configured to use HTTP as the transport. However, Axis2 supports HTTP, SMTP, TCP and JMS transports. You can also write your own transports, and deploy them by adding new transportReceiver or transportSender tags to axis2.xml. To learn how to configure and use different transports, please refer to the following documents.
Attachments
Axis2 provides attachment support using MTOM. Please refer to MTOM with Axis2 for more information.
Security
WS-Security support for Axis2 is provided by Apache Rampart.
REST Web Service
Please refer to RESTful Web Services for more information.
Pluggable Data Binding
Axis2 ships with Axis Data Binding(ADB) as the default data binding framework. However, data binding frameworks are pluggable to Axis2, and therefore you can use other data binding frameworks with Axis2. Please refer to the following documents for more information.
Axis2 Data Binding(ADB)
JiBX
JiBX Integration With Axis2Other Topics
- Axis2 Integration With The Spring Framework
- Web Services Policy Support In Axis2
- Axis2 Configuration Guide
- Axis2 RPC Support
- Migrating from Apache Axis 1.x to Axis 2
- Writing your Own Axis2 Module
- Using the SOAP Monitor
- Writing Web Services Using Axis2's Primary APIs
- Writing Web Service Clients Using Axis2's Primary APIs
- Application Server Specific Configuration Guide